


FAQ
We're happy to answer your questions
About e-mark
How long can I leave the e-mark unused (in the docking station) before I need to clean the printhead?
After a certain period of time when not using the e-mark, the print head needs to be cleaned in order to ensure a good imprint quality. This depends on several external factors, such as ambient temperature or humidity in which the e-mark is used. If the e-mark is not used on a regular basis or after a down time of several days, we recommend to always make a test imprint and clean the print head with a dampened cloth when necessary in order to make nice imprints.
How can I make a straight-lined imprint?
The e-mark has sliding wheels on its bottom, which provides a good guidance into horizontal direction. Nevertheless, a little practice is needed for well-aligned imprints.
Does COLOP provide warranty on my e-mark?
COLOP provides warranty on the e-mark that is obligatory by law and varies from one country to another.
How long does a cartridge last?
The range of the cartridge depends on several factors including size and ink coverage of the imprints. Around 5000 imprints can be made with an imprint that is 14 mm x 100 mm with a coverage of around 15 %, see example below.

Which kind of colour/ink cartridge does the e-mark use?
The e-mark is based on ink-jet technology. You will find a tri-colour ink cartridge inside the e-mark, which was especially adapted for COLOP e-mark in cooperation with Hewlett Packard SPS (Specialty Printing System). The ink is water-based. Any colour combinations can be made with the three inks inside the cartridge.
How long does a cartridge last?
The range of the cartridge depends on several factors including size and ink coverage of the imprints. Around 5000 imprints can be made with an imprint that is 14 mm x 100 mm with a coverage of around 15 %, see example below.

Are there other inks/cartridges available than the standard COLOP e-mark cartridges?
Currently, we only have tri-colour ink cartridges that offer full-colour imprints and imprints are applicable on absorbent surfaces. Further inks are in development and will extend the range of use of the e-mark.

Can I use other cartridges than the ones for the e-mark?
No, only original tri-colour cartridges can be used. Other cartridges with the same size do not work.
Can I use the e-mark on my skin as well?
Do not use the e-mark on the skin. During operation the printhead becomes very hot and can lead to burn your skin.
On which surfaces/materials can I print on with the e-mark?
Currently, the e-mark can stamp on any absorbent surfaces, such as paper, books, cardboard, serviettes or wood. Other surfaces such as glass or metal can be stamped, but need appropriate pre-treatment. Use the COLOP label sheets to mark also other materials with the e-mark.

Is the ink waterproof?
The ink is not waterproof. When applying an appropriate pre-treatment, the resistance against external impacts can be increased.
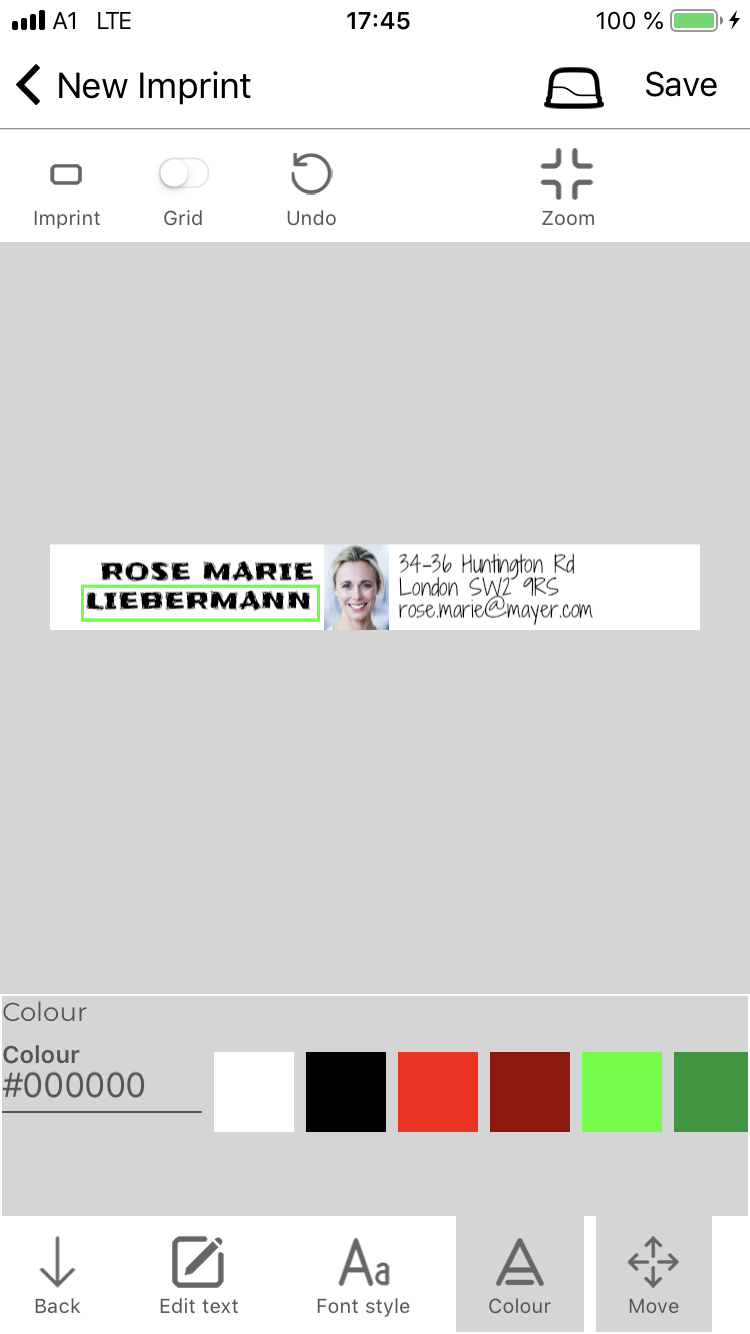
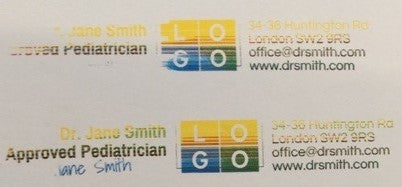
I have a document, form,… with a predefined space for the imprint. How can I position the e-mark into this field?
Markings on the side of the e-mark help to position your imprint precisely in predefined spaces. In addition, you can choose your startposition in the App for better positioning. Lateral positioning means that the e-mark (as in left picture below when moved to the right) will start after the markings on the side of the e-mark. In contrast, when selecting center position the e-mark starts immediately to print when it is moved.

Can I also make imprints in vertical direction?
Yes. The e-mark can make imprints at any angle - be it in vertical direction or even upside down. It makes it perfect for marking cardboard boxes, flipcharts, walls, etc.
The e-mark is mobile - what does that mean?
Can I use the e-mark without power supply?
Of course – the main advantage of the e-mark is its mobility and flexibility. Its inbuilt battery lasts up to five hours when marking continually and even longer under normal usage circumstances. The battery is charged within 3 hours from 0 to 100 %. Use the protective case to transport the e-mark savely from one place to another.

Do I always need my mobile phone/tablet for making an imprint?
No. Once you have set up your e-mark, you can store up to four imprints permanently onto your e-mark. These can be used in the offline mode – without connection to the software. To change between the imprints in offline mode, you need to tap four times on top of the e-mark. Watch our video ‘Switch between stored imprints for further explanations.
For which devices is the e-mark software available?
The App runs on Android and iOS devices (smartphones and tablets) and there is also a software for Windows PCs. The App supports mobile devices with software versions Android 5.0 and iOS 11 and higher. Elderly versions provide only limited functionalities. The Windows version works for PCs using Windows 7 or higher.
![]()
How is data transferred between the e-mark and my mobile device (smartphone/tablet)?
The e-mark generates a WIFI-network, which it uses to connect with your mobile device and to transfer data. Your mobile device does not need connection to the internet for the connection to the e-mark.
Do I need connection to the internet for using the e-mark?
No, the data is either directly transferred via USB-connection from a PC to an e-mark or through WIFI from the mobile device (smartphone, tablet) to the e-mark. In the latter case, the e-mark generates a WIFI-network and connects through it with the mobile device. Internet connection is only required if you want to use a certain image from the internet for your self-made imprint, or if you want to share your imprints with other e-mark users.
Can I use the e-mark with several different devices?
You can use several mobile devices (smartphone, tablet or laptops) and PCs with one e-mark. Please notice that at a time, only one device can be connected with the e-mark and send imprints. However, the App can be used at any time and imprints can be generated even without connection to the e-mark. It is also possible to save several e-marks under 'My e-mark' in the settings area and switch between them.

Before connecting to a device, make sure that no other device is currently connected to your e-mark. This can easily be found out by the light on the right back side of the e-mark. If there is no light or yellow/green light during charging, the e-mark is not connected with any device. In case this light is blue, a device is connected via Wifi and if it is pink, there is an active USB connection.
When sharing imprints from one device to another, please make sure to only use software font styles, otherwise you may have to format your imprint again. These software fonts are the same on all versions of the app - be it iOS app, Anroid App or Desktop version.
What is an imprint & how can I create one?
An imprint is the image that is made in the e-mark App and then sent to the e-mark and printed. It can be a combination of different texts, date and time, number, images and the like.

How can I create an imprint?
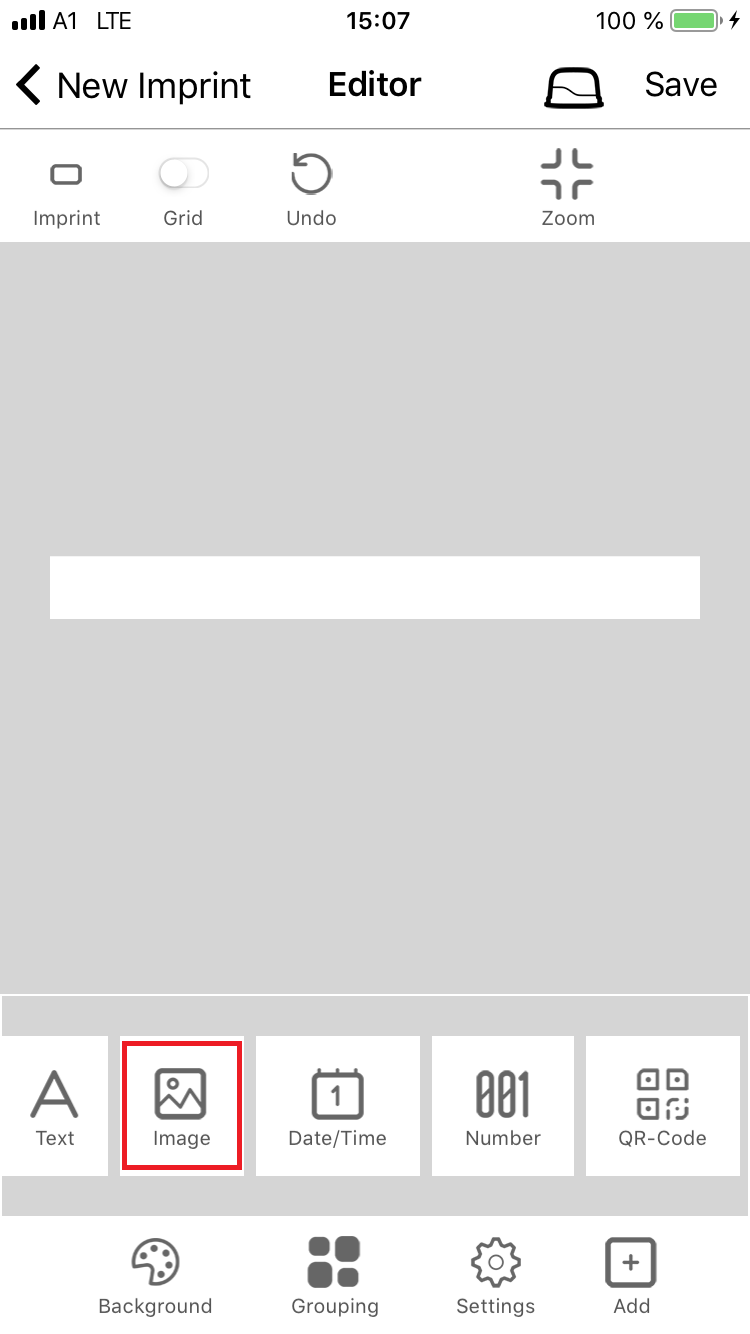
The e-mark App offers an extensive range of ready-to-use imprints. You can easily adapt them with your own data, logo,... Another option is creating your own imprints by adding texts, symbols, images, numbers, date and time, QR- or barcodes or other elements to a blank field.


What is the maximum size of an imprint?
One imprint can be up to 14 mm high and 150 mm long. Use the continual marking function in the App to repeat your imprints and make even longer markings.

I want to make an imprint that is larger than 14 mm in height, what can I do?
The app offers the possibility to design multi-line imprints, which allows to make imprints with up to three lines. Please watch the video “Make a multi-line imprint” for further explanation.

Which data files can be inserted for an imprint?
You can add PNG or JPEG images to your imprints.

Can I also print pictures with the e-mark?
You can add logos and pictures to your imprints. Be aware that the height of one line of an imprint is 14 mm. Therefore, printing larger pictures does not make sense.
E-mark in use
How do I put the e-mark into operation?
For the initial setup of the e-mark, please follow the steps in our Quick Setup Guide. It is included in every packaging or can be downloaded here.
After having assembled the e-mark according to the Quick Setup Guide, you can download the App for Android and iOS devices in the Google Play Store or AppStore. Please follow the initialisation guide in the App, which includes connecting to your e-mark for the first time via WiFi (mobile devices) or USB interface (PCs). For first initialisation only set up the WiFi connection through the App and not through the WiFi settings of your device!
Attention: for Android devices the mobile data (internet) needs to be turned off in order to be able to connect to your e-mark!

Where do I find SSID and password of my e-mark?
The access data of your e-mark (SSID and password) is printed on the Quick Setup Guide. In addition, an imprint is saved on the e-mark when receiving it in its intial state, which includes the SSID and password. When switching the e-mark on and making the first imprint, you will see this information.

Do I need to charge my e-mark before turning on?
The e-mark is charged between 20 and 30 % when switching on for the first time (given that the contacts of the battery are still covered with the battery pull tab). It should be possible to turn it on and make the first few imprints. During the first initialisation, it might be necessary to charge the e-mark. However, the e-mark can also be used during charging. In case, you cannot turn on the e-mark, connect it to the mains and continue the initialisation.
How to print several imprints after one another (printing queue)?
You can have one or several imprints in your printing queue (e-mark connect page). When having several imprints in the printing queue they will be sent to the e-mark one after the other. It stops at the last imprint, which will also stay on the e-mark and can be repeated as often as wanted.
When selecting continual marking on the bottom, the printing queue will run in a loop, which means when the last imprint has been reached, it sends the first one again.
By clicking on the "+" Button on the bottom right side, you can select one or more imprints to be added to your printing queue.
TIPS:
- By clicking on an imprint in the queue, you can flexibly switch to the one imprint that should be sent, regardless of the actual sequence
- The sequence of the imprints in the queue can be changed by drag and drop
Printing several imprints consecutively (in a printing queue):
Click on "send imprint to e-mark" to send the first imprint and print it. When hearing the signal of the e-mark, the next imprint will be sent. Wait for the transfer to be completed (double beep) and print the next imprint in your queue.
How can I make a consecutive numbering with my e-mark?
Creating a consecutive numbering imprint in the app
To create a numbering imprint, select "create new" and add a numbering element to your imprint. Alternatively, you can choose one of the pre-installed numbering templates and click on the numbering element.
You can choose the following numbering settings:
- Starting point/First number
- Steps to count upwards
- Digits of your number (00123 would be 5 digits)
- End point of your numbering
- Change after 'x' imprints (an imprint/number can be repeated several times before it counts upwards)
- Define a prefix or suffix to your number
Printing consecutive numbering imprints:
For using the automatic numbering function, the e-mark always needs to be connected to the app!
1. Send numbering imprint to the e-mark
2. Print it (beep indicates end of the imprint!)
3. Wait until the next number has been sent (you will see the number changing on the screen of your app, it is sent immediately) - the e-mark beeps when transfer is completed
4. Print it
... repeat step 3 and 4 as long as you want to continue
Please be aware that an imprint that includes an automatic numbering, cannot be stored permanently on the e-mark and it cannot be used in a printing queue together with other imprints!
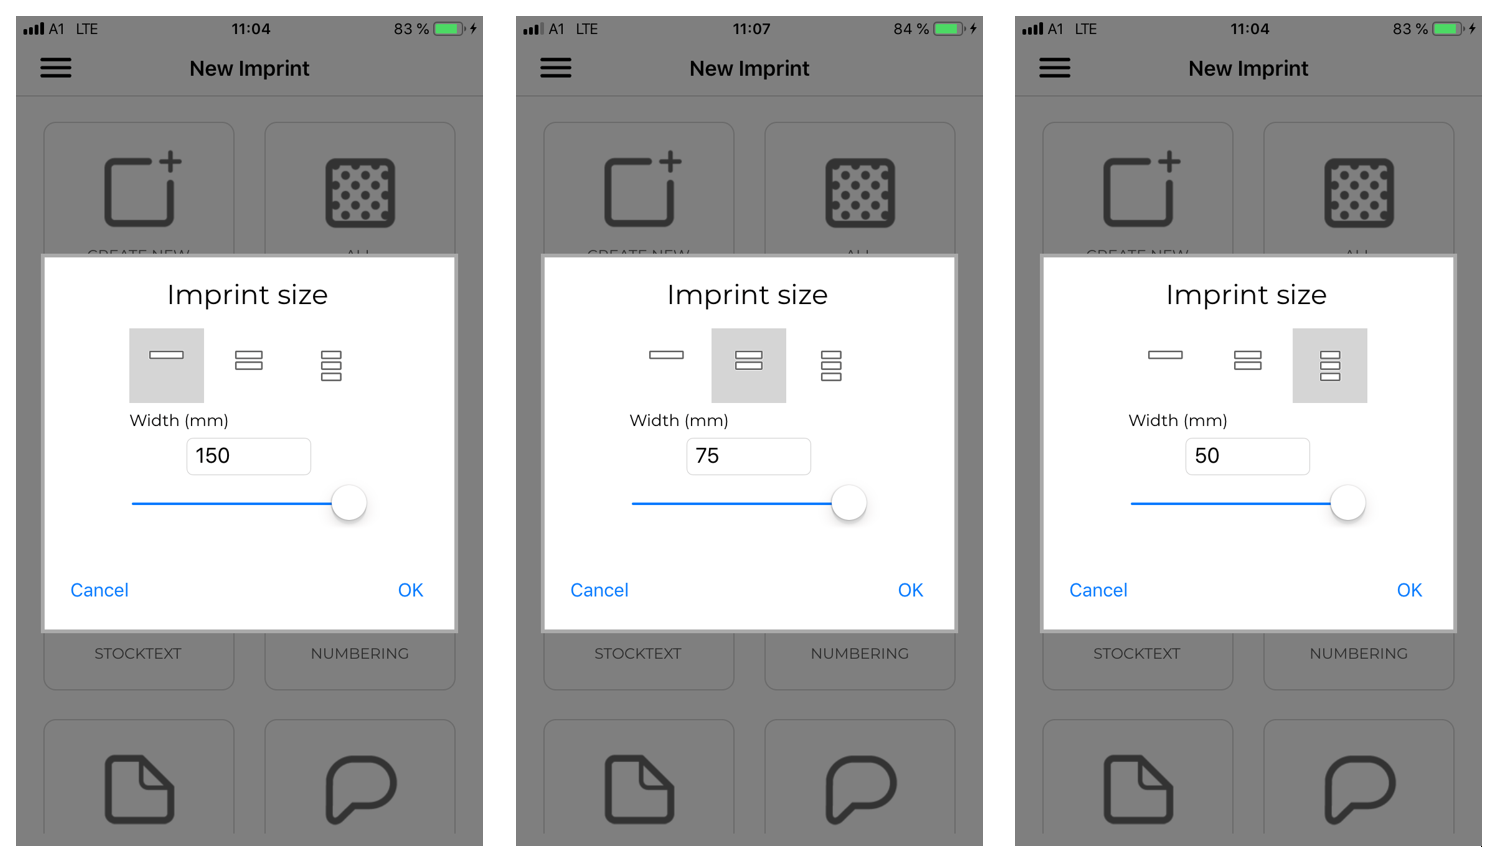
How can I make 2- or 3-line imprints?
Creating a 2- or 3-line in the app
To create a new 2- or 3-line imprint from scratch, select "create new" and a window appears to select number of lines (1 – 3) and length (max. 150 mm) of your imprint. The maximum size of an imprint is 150 x 14 mm, which is divided in the number of lines selected. Hence, a 2-line imprint can have a max. lenght of 75 mm and a 3-line imprint 50 mm.
Alternatively, you can also choose one of the pre-installed 3-line templates in the app and edit it.


Printing a 2- or 3-line imprint
When making a multiline imprint (imprint already sent to e-mark before), please listen to beeps of the e-mark - it will tell you whenever changing direction for a new line.
1. Take e-mark from docking station and start to move the e-mark to the right until you hear the first beep
2. Then move the e-mark downwards until the next signal
Now start the second line to the left until hearing the beep
4. Move the e-mark again downwards until the next signal
5. And finally making the third line until hearing the last beep (6.)

TIPS:
- Never lift up the e-mark during a 3-line imprint from the paper, otherwise it starts again with the first line.
- Please be aware that a 3-line imprint needs a little practice. Don't worry if your first try is not perfect yet :)
Can I print several imprints at one time?
Yes. You can add several imprints to the printing queue which are sent sequentially to the e-mark. If needed, this queue of imprints can run in a loop and start always from the beginning again.
How can I store imprints permanently on the e-mark?
The last imprint that you have sent to the e-mark is always stored on it. In addition, you can store three more imprints permanently. Under 'imprints on e-mark', you can select three imprints for each position/colour. Note that you always need to be connected to your e-mark in order to save an imprint on the device.
How do I change between the imprints stored on the e-mark?
There are two possible ways to change between the imprints stored on the e-mark. Either you click on the e-mark symbol in the App under 'imprints on e-mark'. The respective imprint will be activated then. The second option is tapping four times onto the e-mark with a little break after the first double click. It is best to watch our video 'Switch between stored imprints' for exact sequence of movements.
How do I know on which position which imprint is stored?
Under 'imprints on e-mark' in the e-mark App you can see which imprint is stored on which position. This is displayed on the e-mark by the LEDs of the light pipe on the side which match the colours in "imprints on e-mark" and change when switching to another imprint.


Can the e-mark be charged via USB-cable as well?
The e-mark can only be charged through the power adapter that comes with the e-mark. The USB-interface cannot be used for charging the e-mark. Instead it is used for transferring imprints from the desktop software via USB cable.

How long does the battery of the e-mark last?
The battery lasts up to five hours when marking continually and much longer under normal usage circumstances - several days up to a week when used occasionally. The battery is charged within 3 hours from 0 to 100 %. Nevertheless, it is recommended to put the e-mark immediately after every imprint back into the docking station, which can be connected to the power plug at the same time.
Where do I see the status of the battery?
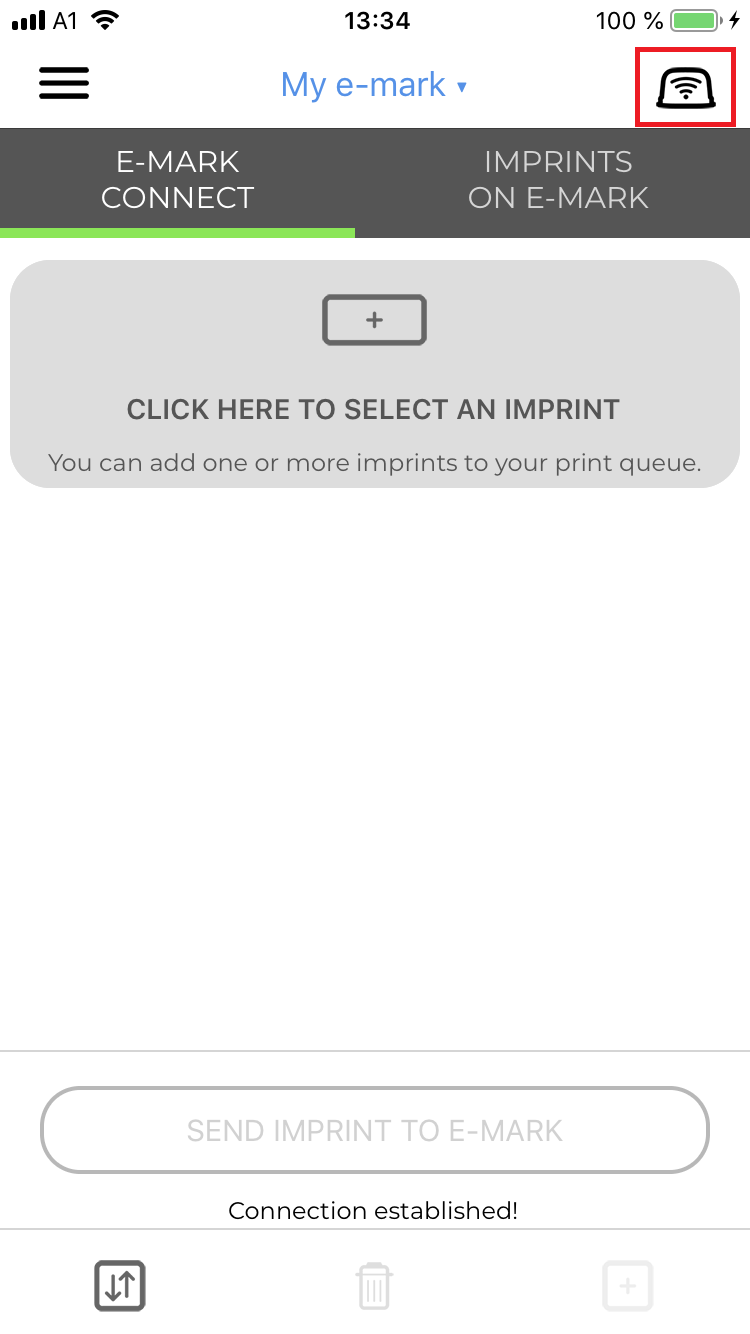
Both the lightpipe of the e-mark as well as the App indicate the level of battery. The left LED on the back side of the e-mark shines either green, yellow or red. The battery level can also be found in the e-mark information in the App. Select the e-mark icon on the top right of the e-mark connect page. You will find the exact level (%) of battery.

How do I know that the battery needs to be charged?
Below a battery level of 25 % the e-mark shines yellow in the back. The LEDs blink continually red if the battery level is below 10 %. In addition to that, the App gives you also a warning when your battery is low and needs to be charged. Please charge the e-mark as soon as the yellow LED lights up.
How can I see that the battery is charging?
When the e-mark is turned on, lights on the back of the e-mark provide a status indication of charging. A yellow blinking light means, that the the battery is still below 50 %. A green blinking light indicates a battery level between 50 and 99 % and a steady green light indicates a full battery. You can also follow the state of the battery in the App under 'e-mark information'. Note that there is no indication for charging when the e-mark is turned off.
How long does the battery of the e-mark last?
The battery lasts up to five hours when marking continually and much longer under normal usage circumstances - several days up to a week when used occasionally. The battery is charged within around 3 hours from 0 to 100 %. Nevertheless, it is recommended to put the e-mark immediately after every imprint back into the docking station, which can be connected to the power plug at the same time.
How to best transport the e-mark?
It is recommended to transport the e-mark in the original packaging or in the additionally available protective case in order to protect it from dust, humidity, shocks and other external influences. Please note that the original packaging of the e-mark is no transport packaging and needs to be packed into an outer box if it is sent.

When and how do I need to make a software update?
Update the e-mark App
Whenever there is a new update for the e-mark App, it is recommended to update it (via Google Play Store or App Store), because the functionality may be extended or probable bugs may be fixed. Depending on the settings in your respective app store you will receive an automatic notification for making the update.
Update the software on the e-mark (=firmware)
In addition to the App, also the software on the e-mark is improved from time to time. This software is called firmware. The update can be made through the App. A notification will pop up when opening the App, which needs to be confirmed in order to make the firmware update of the e-mark.
How do I know that the e-mark is connected to my mobile device?
When the connection between e-mark and mobile App is established, a blue LED shines on the right side in the back of the e-mark. A USB connection between your e-mark and PC is indicated by a pink LED on the same position. In the App you will also find information to the quality of connection and whether or not the Wifi connection could have been established.


Can I turn off the beeping of the e-mark?
The sound of the e-mark can be turned off in the App. In the 'e-mark information' on the 'e-mark connect' page, the settings can be found for switching the sound on and off. Be aware that the e-mark provides acoustic signals when e. g. an imprint is ready to be made or is indicating the end of an imprint. Without these signals you might have problems in usage. Therefore it is only recommended to switch off the e-mark sounds if you are an advanced user.

What do the lights and beeps of my e-mark mean?
The e-mark is communicating with the user by acoustic signals and the lightpipe (LED bar around the e-mark). The colours and position of the lights, as well as the acoustic signals have different meanings. In general, red indicates a problem (no cartridge inside or very low battery) and yellow is a warning, e. g. that the battery is low. Blue is related to the WiFi connection and data transfer and green tells you that the e-mark is ready or battery is full. Please find the description of the different signals below.
What does the beeping mean?
Whenever an imprint is successfully transmitted to the e-mark or an imprint is finished, the e-mark beeps. When making a two- or three-line imprint, the beeps of the e-mark tell you when to change direction and move to a new line. When the e-mark keeps beeping and blinks red, this is a warning to put the e-mark into its docking station. Otherwise the print head may dry out, causing bad imprint quality. If you do not like the sound of the e-mark, it can be turned off in the 'e-mark information'.
What does a blue light mean?
Blue light refers to the connection and data transfer. An ongoing blue blinking around the e-mark indicates that an imprint is transferred from the App to the e-mark. The steady blue light on the back of the e-mark indicates that the e-mark is connected to a mobile device via WiFi.
What does a pink steady light in the back mean?
A pink light on the right back side of the e-mark indicates that the e-mark is connected to the desktop software of your PC via USB.
What does a green light mean?
On the back side of the e-mark, a green light indicates that the level of battery is above 25 %, which turns yellow below a level of 25 % and red when reaching 10 %. During printing you will see a green light on the side which indicates that the e-mark is printing.
What does green, blue, orange or pink lights on the side of the e-mark mean?
It is possible to store up to four imprints permanently on the e-mark. The different colours on the side of the e-mark indicate at which position you are right now and which imprint of the four will be printed. The last imprint that was sent is always stored on the green position. Under 'imprints on e-mark' you can select 3 further imprints, which are also in the App highlighted in blue, orange and pink. When changing the position (by tapping four times onto the e-mark - watch the video here), the lights will change from green to blue, orange or pink.
What does a red blinking light in the front of the e-mark mean?
It indicates that no cartridge is inside the e-mark. If a cartridge is inside and the light is still blinking red in the front, the cartridge is probably not in the right position and needs adjustment.
What does a yellow blinking light in the front of the e-mark mean?
It indicates that a wrong cartridge is inserted (not an original COLOP cartridge). Please only insert original COLOP e-mark cartridges.
What does a red blinking light on the side in the direction of the back of the e-mark mean?
It indicates that the battery is below 10 % and needs to be charged.
E-mark App
I know that I can create a QR code in the e-mark app - what is the maximum character size of the QR code?
There is no limitation of character size for QR codes in our app. However, please keep in mind that the size of the QR code increases with a rising number of characters behind. As the maximum height of an imprint is 14 mm, in terms of readability of the QR code once it is printed should also be given.
We tested QR codes with different character sizes and even ones with 60 or 80 characters were still well readable by our QR code readers. Nevertheless, please consider that readability of the printed QR code depends also on the quality of the QR code reader of the device, mobile phone, etc. used.
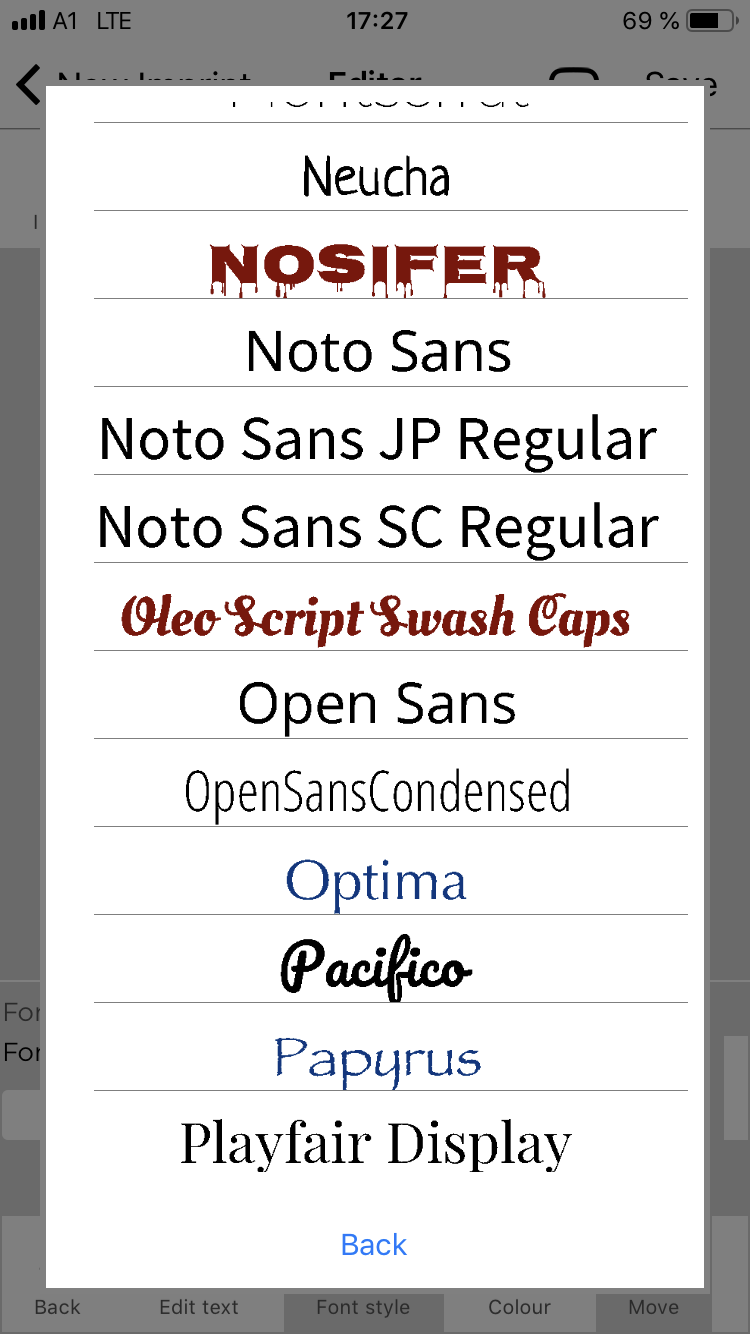
How can I use own fonts for my imprints?
You can load any font styles (of which you have the right of use) into the app. Make sure you have a “.ttf” file of the respective font.
In addtion to these fonts, also system fonts can be accessed, which are installed on your mobile devices or PCs. In the mobile App, these system fonts are displayed in dark blue, in the desktop version you can switch between fonts from the software and system. Customfonts are shown in brown colour.
Please note that imprints might need formatting when sending it to another device which does not have the same font styles installed.
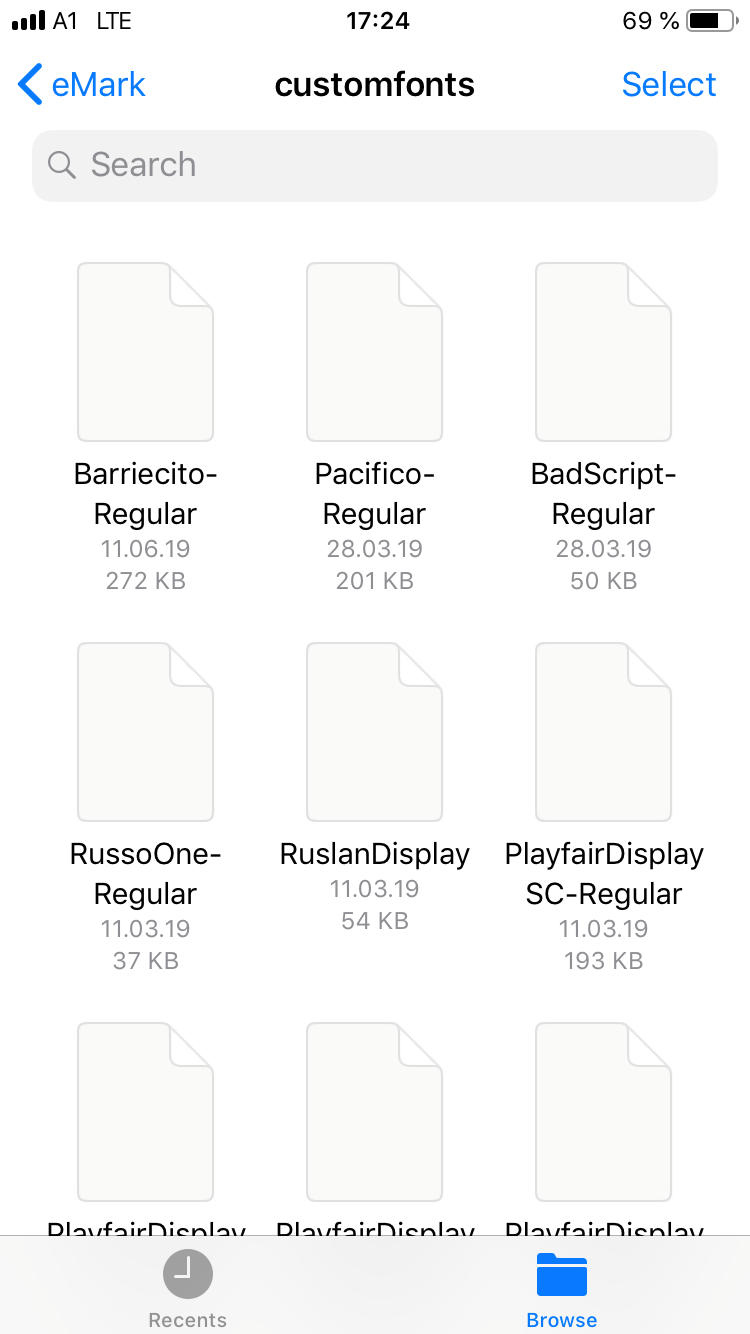
On a mobile phone/tablet you need to follow several steps:
1. For Apple devices: Open the “files” app (blue folder) and click on “on my iPhone”. In this folder is an “e-mark” folder, in which another “e-mark” folder can be found.
For Android devices: Open the “files”/”file manager” app, click on “internal storage” and search for the folder “documents”. In here, click on another “e-mark” folder.
In this "e-mark" folder you will find a folder named "customfonts"
2. Copy the individual .ttf files into the "customfonts" folder
3. Restart the app (close before in task manager)
4. The newly added fonts will now be displayed in brown colour

On PCs and laptops:
1. Install new fonts on your PC
2. Switch under "font styles" in the editor from "Software" to "Windows" and select a font style

Are there more templates than the ones in the App?
The e-mark App encompasses a set of predefined templates. More templates can be found on our website. You can access them directly from the App. Click on the last template category 'More templates online' to select and import more templates directly.

Which data files can be inserted for an imprint?
Currently, PNG or JPEG images can be included in your imprints.
Can I transfer imprints to another device's application?
Yes, you can share your imprints with other devices by simply export them under "My imprints". These can be sent via Bluetooth or e-mail to other devices.

What can be done in the e-mark App?
Use the App to create your own imprints or use one of the numerous ready-to-use templates. The imprints can easily be sent to the e-mark and printed immediately. The App offers several functionalities such as automatic date and time function, numbering function, barcode and QR-code generator and much more.


What can be done in the editor?
In the editor, own imprints can be created. Texts, images, symbols can be added as well as special functions such as an automatic date and time, automatic numbering or QR- and barcode generator. The colour of texts or symbols can be changed easily as well as their size, angle, position, etc.

As the e-mark has no display, how do I operate it? Why do I need a special App?
The e-mark is operated by a software on a mobile device (tablet, smartphone, laptop) or on a PC. It generates a WIFI-hotspot and connects then to your mobile device. For the desktop version, you can connect your Windows PC via Wifi or USB cable to your e-mark. In the software, imprints can be created, changed and transferred to the e-mark, which is immediately ready to stamp.
How can I transfer images onto the e-mark?
You can easily implement images which are stored on your device (smartphone, tablet - not only in a cloud) by adding them in the editor.

What Apps are available for the e-mark?
Currently, COLOP provides an App (for Android and iOS devices) that is focused on making any kind of stamp imprints (getemarkapp.colop.com). It is possible to create multi-colour imprints with your logos, images, texts, numbers, barcodes, and much more. These imprints can directly be made in the App, which can then be sent to the e-mark.
Beside the mobile app, COLOP also offers a desktop software for Windows PCs (download here). It has the same functionalities as the mobile version. You can connect your e-mark to the Windows software either via Wifi or via USB cable.


Troubleshooting
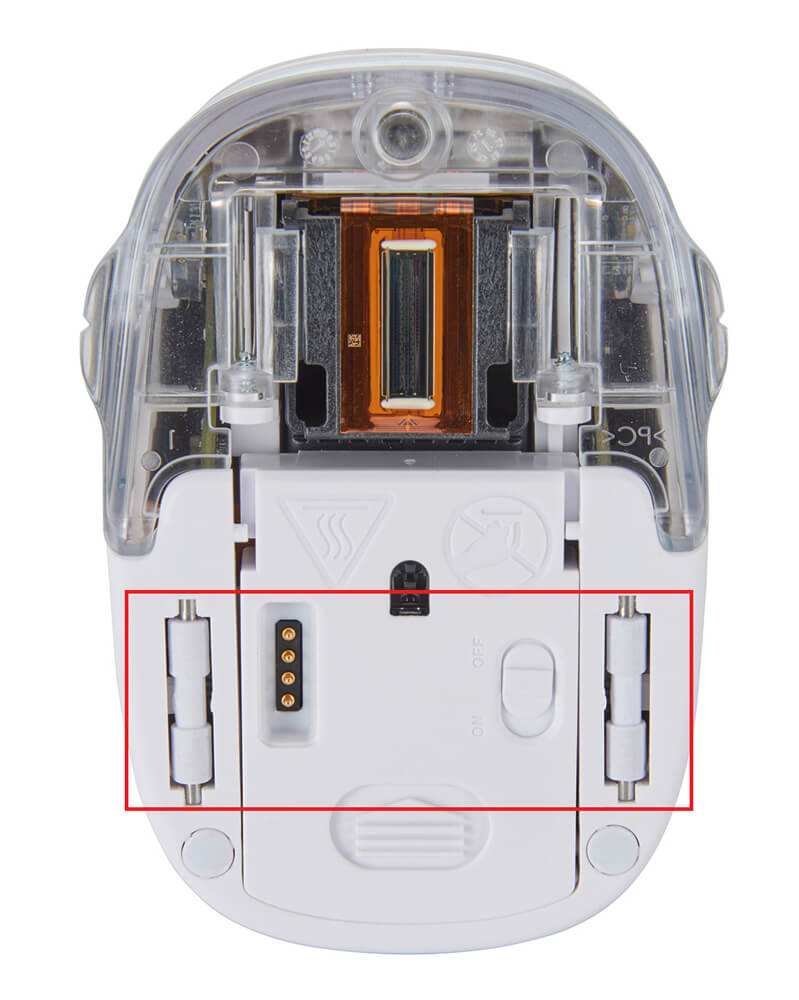
I want to remove/change the cartridge, but I cannot remove it from the main body. What can I do?
Remove the top cover and battery. Please ensure to open the bottom latch before pulling out the cartridge. Only when it is open, the cartridge can be removed. Watch the video “How to change a cartridge” for further details.

The imprint quality is decreasing/not satisfactory, what can I do?
The quality of the imprint depends on several different aspects. Most of the problems can be put down to the cartridge. Either the print head is (slightly) dried out, the cartridge is (almost) empty or not inserted rightly.
If imprint quality is decreasing, please consider the following points:
- Always put the e-mark in the docking station immediately after usage to avoid drying out of print head
- Cleaning the print head by wiping over it with a damp cloth
- Cleaning the plastic parts on the bottom of the e-mark (around the print head)
- Put out cartridge and re-insert it
- Ensure a proper surface to print on (e.g. sheet of paper on hard underground, no rippled surfaces)
- Try to move as straight as possible over the surface
In the following are the possible defect imprints:
- Stripes in the imprint or parts are missing --> re-insert cartridge

- Colours of the imprint in the App do not match the colours in my printed imprint --> clean the print head, exchange the cartridge (if already almost empty)
- Pale imprint --> try to print slower, clean print head, exchange cartridge (if already almost empty)

- Pale at the beginning of imprint or wrong colours --> cleaning print head

Vertical gaps in the imprint or offset --> choose right surface, material

- Offset in imprint --> move straightly
- Stains before the imprint --> wait until cleaning routine is completed before making imprint on a document, clean plastic parts around the print head if dirty


- Small stripes, points before imprint --> move only in one direction (right OR left)

My e-mark does not stop beeping and blinking. What can I do?
This is a warning to put the e-mark back into the docking station, which starts after one minute of standing outside the station. Please put the e-mark always into the docking station in order to avoid the print head to dry out.
My e-mark does not print the current date and time. What can I do?
The App takes the time and date of your device (smartphone, tablet, PC) and in order to print the most current time and date, you always need to resend the imprint to the e-mark.
I want to print a certain imprint, but another one is printed. What can I do?
An imprint always needs to be sent to the e-mark in order to be printed. If you exchange the imprint in your print queue, you need to send it - this is not done automatically. In case that your imprint includes a numbering or time function, they cannot be saved on the e-mark, as they will be outdated when printing them more than one time. In such case, the imprint that was sent before will be printed (not including numbering and time function). It may also happen that the e-mark is switched off before the imprint was saved on the device.
Please also check which colour you see on the side of the e-mark. Maybe you accidentially switched to one of the imprints stored on the e-mark.
I cannot switch between the imprints stored on the e-mark. What can I do?
Check in the App under "Imprints on e-mark" if you have really saved imprints on your device. Try to replace one of the imprints or save a new one and try again to switch. Maybe the imprints were accidentially deleted from your device. For changing the position, you need to tap four times on the e-mark with a small break between the first double click. Watch our video 'How to change the imprints stored on the e-mark' for exact sequence of steps.

What is the reason for the cloud of dust everytime when I remove the e-mark from the docking station?
This service routine is an automated cleaning of the printhead which is needed to ensure good quality imprints. Attention! Do not move too fast from docking station to paper, it could lead to a dirtying of the paper with ink. It is recommended to take the e-mark from the docking station, hold it in the air for some seconds until the cleaning cycle has been performed. Then print the desired surface.


I have lost my Quick Start information and cannot remember my e-mark's SSID and password. Where can I find this information?
In case you do not remember your SSID and password and cannot find your Quick Setup Guide any more, you need to make a reset.
For making a reset, the e-mark needs to be turned on. Open the cover of the e-mark. On the top on the right side beside the battery, you will find a small hole. Use a paper clip or similar thin item to press inside this hole for several seconds. The e-mark will be restarted and brought to its initial state. Then make an imprint on a blank piece of paper. On the imprint you will find your e-mark's initial SSID and password. Be aware that all imprints that were stored on the e-mark are deleted and need to be sent once more to your device. Watch 'How to make a reset' or download the short manual for exact sequence of steps.

Why does my e-mark turn off after some time?
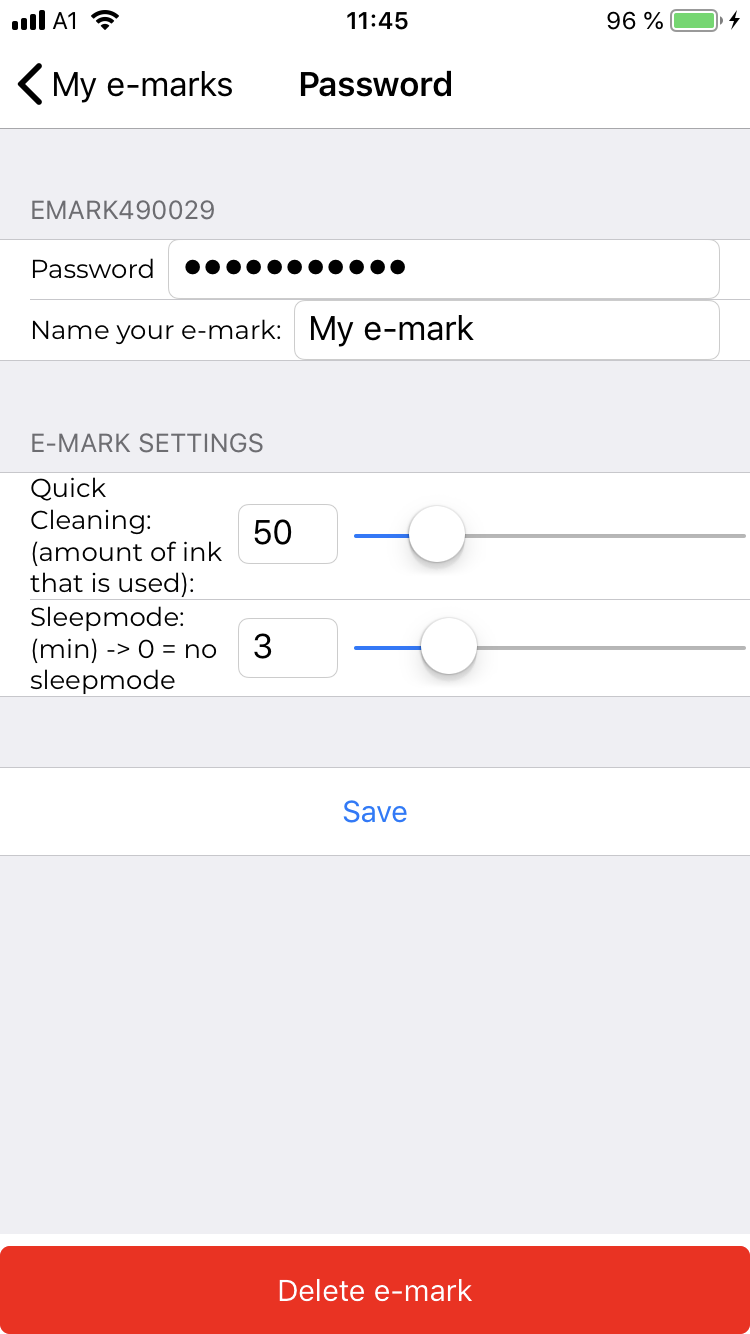
After 3 minutes not being used, the e-mark is set into the sleeping mode to save energy and to extend battery life. It can be awakened by picking up the e-mark slightly from the docking station.
In the settings area of the App, you can adjust the period of time when the e-mark should go into sleep mode.
My e-mark does not charge. What can I do?
Check whether the contact of the batteries are free of any tape and plug in the power adapter strongly. Turn on the e-mark and check if LEDs light up. Note that the e-mark can only be charged with the power adapter that can be found in the packaging of the e-mark - the USB interface CANNOT be used for charging the e-mark.
My e-mark is not turning on anymore. What can I do?
Your battery is probably totally discharged. Charge it for several hours. After around 3 hours it should be full again. Ensure that the e-mark is charging by turning it on and seeing lights shining in the back of the e-mark. Note that the battery discharges itself slightly also when it is turned off. Please activate your e-mark at least once per month to ensure a steady printing quality and battery life.
How can I see that the battery is charging?
When the e-mark is turned on, lights on the back of the e-mark provide a status indication of charging. A yellow blinking light means, that the the battery is still below 50 %. A green blinking light indicates a battery level between 50 and 99 % and a steady green light indicates a full battery. You can also follow the state of the battery in the App under 'e-mark information'. Note that there is no indication for charging when the e-mark is turned off.

It takes quite long to transfer an imprint to the e-mark. What is wrong?
The Wifi connection between the mobile device and e-mark is weak - try to operate the App directly next to the e-mark. If the e-mark is directly beneath your mobile device, check whether your smartphone or tablet is really connected to your e-mark.
I cannot send an imprint from the App. What can I do?
If you cannot send an imprint, there is no Wifi connection between the e-mark and your mobile device. Ensure that your e-mark is switched on and the battery is not empty - by checking whether you see lights on the light pipe when switching it on.
To find out why it is not connected, go to the settings area and select "My e-marks". If your e-mark (with the correct SSID-number) is not listed here, it needs to be registered. Click on "Add e-mark" on the bottom of the page and enter SSID and password of your e-mark. If it is listed here but could not connect, then connect to your e-mark through the Wifi-settings of your mobile device. Go to the general settings of your device and search for the WiFi settings. Select your e-mark and type in your password.


Please note: Only one mobile phone/tablet can be connected at a time with the e-mark. If another device is already connected to the e-mark (blue light shining in the back of e-mark), you need to disconnect first. Please note: If you have an Android device and have problems with connecting to your e-mark, it can help to turn off the mobile data of your device while using the e-mark.
Please note: The e-mark goes automatically into sleep mode when not used for more than three minutes. After waking up, WiFi connection needs to be re-established.
How can I establish connection between e-mark and my mobile device when it is not done automatically?
You can click on the e-mark information (e-mark symbol on top right corner of e-mark connect page). If the respective e-mark is registered in the App, a notification will pop up - click on "connect". Another option is to set up the connection via the the WiFi settings of your device, as described above.

Maintenance
How can I replace a cartridge?
For replacing a cartridge, the top cover and battery have to be removed. Open the bottom latch, exchange the cartridge and assemble the e-mark again.
For a detailed explanation, please watch the video "How to change a cartridge".


Can I start the cleaning of the print head manually?
The app has a button for manual cleaning of the nozzles if needed. Please follow the instruction in the user manual
I have not used the e-mark for more than one month. What do I need to consider?
In order to ensure a steady imprint quality, it is recommended to use the e-mark on a regular basis. Be aware that the battery of the e-mark might be empty when not used for such a long time, which needs to be charged again.
Furthermore, when not used for a longer time, the print head should be cleaned with a wet cloth to ensure nice imprints.
When and how do I have to clean the e-mark?
Whenever your imprint quality is not satisfactory anymore, it is recommended to clean your print head. This can be done with a damp lint-free piece of cloth.
The plastic parts of the e-mark (the docking station, bottom side of the e-mark or the cover) can be easily cleaned with a moistened cloth (pure water without cleaning agent!).
Desktop Software
Where can I see whether I have the current desktop version?
The version number of your desktop software is shown in the settings. You may have to scroll down to see it, the version is at the bottom of the page.

How does CONTINUAL MARKING work?
With the function CONTINUAL MARKING an imprint can be repeated as often as wanted while the e-mark is pushed to the right (or left). To do this, simply select "continual marking" in the print queue E-MARK CONNECT, send the imprint and you are ready to print endlessly!

If there are several prints in your print queue, "continual marking" has a different meaning. If this function is activated, the print queue runs in a continuous loop, i.e. after the last imprint in the queue, the first imprint is automatically sent again.

How can I edit an imprint once again?
Under MY IMPRINTS you will find a symbol under each imprint by which you can edit the imprint at any time.

How can I export / import imprints?
Under MY IMPRINTS you will find the possibility to export/share or import imprints.
Export / share imprints
After clicking on "Export" one or more imprints can be selected from your saved imprints in MY IMPRINTS. Then a storage location on the laptop / PC can be selected. This ".emark" file can then simply be sent by e-mail or similar and can be opened on other devices with the desktop software or the mobile app.


Import imprint
If you have saved one or more imprints on your laptop / PC as a ".emark" file, you can easily select them by clicking on "Import".

When sharing imprints with other devices, please ensure that only software fonts are used, i.e. no Windows fonts, as otherwise it might need reformatting when importing into the mobile app.
What fonts are available in the software?
The software already contains more than 30 different font styles, which can be used on any device - regardless of whether it is on the Android app, iOS app or desktop version. In addition, system fonts can be used. In the desktop version, you can easily switch between software and Windows fonts. Please note though, that the selected font may not be available in the mobile version of the app, which might require to reformat your imprint again when importing it on a mobile app, as the font style is here not available.

How do I create a new imprint in the software?
To create a new imprint, either click on CREATE NEW at the bottom of the start page or click on NEW IMPRINT on the tab in the upper area.

You can choose between a 1-, 2- or 3-line imprint and define the length of the imprint. Please note that the maximum imprint length of 150 mm is divided between the number of lines. Besides, one of the many templates can also simply be chosen and modified as required.
If the imprint is saved in the editor at the top right, it can be found under MY IMPRINTS. There it can be edited again at any time or printed directly.

In the app there is the possibility to automatically pre-fill imprints with your own data. How can I add this "My data" in the software?
You can add or change your own data in the software settings (button on the top right) under "My data". In addition to variables such as first name, last name, address, etc., the logo can also be uploaded.

This data can then be accessed during creating an imprint in the editor. In text fields, single variables out of your data can be selected. In addition, many of the available templates in the software contain already variables and are filled with your data automatically.

When formatting your imprint, please note that the standard text can be smaller than the stored text under "My data ". This may require to reformat the imprint.
How can I start print head cleaning in the desktop version?
There are two ways to to printhead cleaning; via app or manual cleaning.
In the app you will find a button for quick cleaning in the settings.
Whenever your imprint quality is not satisfactory anymore, it is recommended to clean your print head. This can be done with a damp lint-free piece of cloth.
The plastic parts of the e-mark (the docking station, bottom side of the e-mark or the cover) can be easily cleaned with a moistened cloth (pure water without cleaning agent!).
Please follow the instructions in the app.
How can I change the language in the software?
In the software settings you can select the desired language and the appropriate date format.
Please note that a restart of the app might be necessary such that all buttons are displayed in the newly selected language.
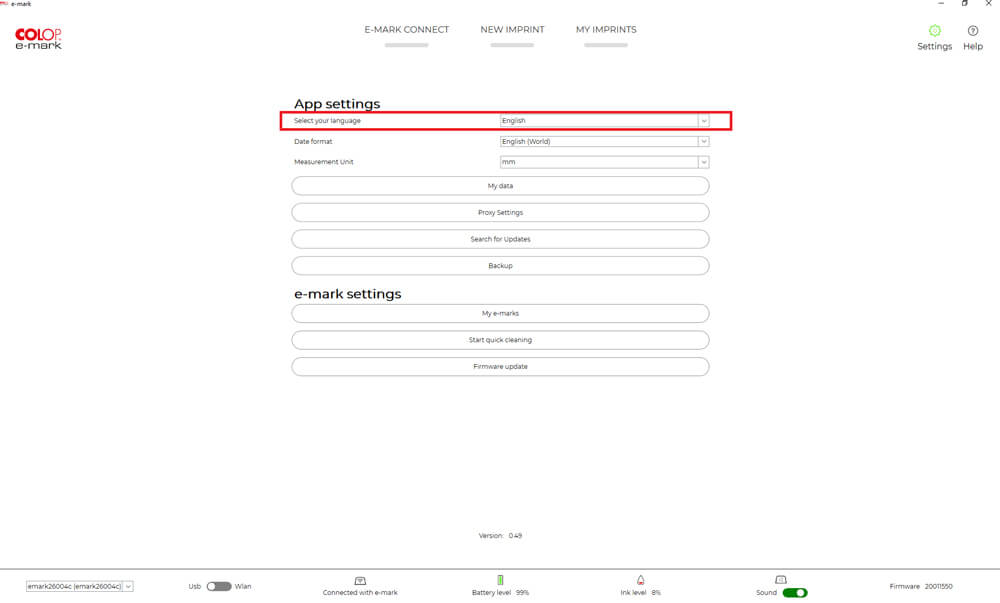
The software is already available in the following languages:
German
English
Danish
Czech
Spanish
French
Italian
Hungarian
Dutch
Polish
Portuguese
Romanian
Swedish
Turkish
Bulgarian
Hebrew
Arabic
Japanese
Chinese
How can I make a backup?
In the settings (button on the top right) under Backup you can create a new backup file or import a backup file.
When creating a backup, all imprints, stored e-marks, settings and data are saved in a file so that they can be restored at a later time or on another device. This backup can then be saved on your PC or mobile device, and it can also be sent via email or similar. Even if the app is uninstalled and reinstalled, all data is otherwise deleted
If you want to restore a backup, you can click in the settings on Import backup and select a backup file.


I have a document, form,… with a predefined space for the imprint. How can I position the e-mark into this field?
Markings on the side of the e-mark help to position your imprint precisely in predefined spaces. In addition, you can choose your startposition in the App for better positioning. Lateral positioning means that the e-mark (as in left picture below when moved to the right) will start after the markings on the side of the e-mark. In contrast, when selecting center position the e-mark starts immediately to print when it is moved.
How can I save imprints on the e-mark permanently?
In addition to the one imprint that is saved through E-MARK CONNECT, three further imprints can be saved permanently. These can then be printed without a connection to the app (offline mode). Please go to the homepage (E-MARK CONNECT) - on the right-hand side (IMPRINTS ON E-MARK) the three desired imprints can be selected which should be stored permanently to be printed anytime in offline mode.
You can exchange these imprints at any time as required.
To save the imprints, a connection to the e-mark is needed.

How do I send an imprint to the e-mark?
Imprints must always be sent to the e-mark via E-MARK CONNECT. If you have already an imprint in your print queue, it can simply be sent to the e-mark by clicking on the green button on the bottom "Send imprint to e-mark". To send your imprints to the e-mark you need to connect your e-mark via Wifi or USB cable. For adding imprints to your print queue, there are several options, though.

Add imprints to the print queue
There are three ways to add imprints to the print queue:
1. On the E-MARK CONNECT page, an imprint can be added to the print queue in the left area by clicking on the arrow.
2. An imprint can also be added directly to the print queue from the MY IMPRINTS page. All you have to do is selecting the desired imprint from the list and click on the e-mark symbol to transfer it to the print queue.
3. In the editor there is also the possibility to send an imprint to the print queue. When your imprint has been completed, it can simply be transferred to the E-MARK CONNECT page by clicking on "Save and add to print queue " at the top right.
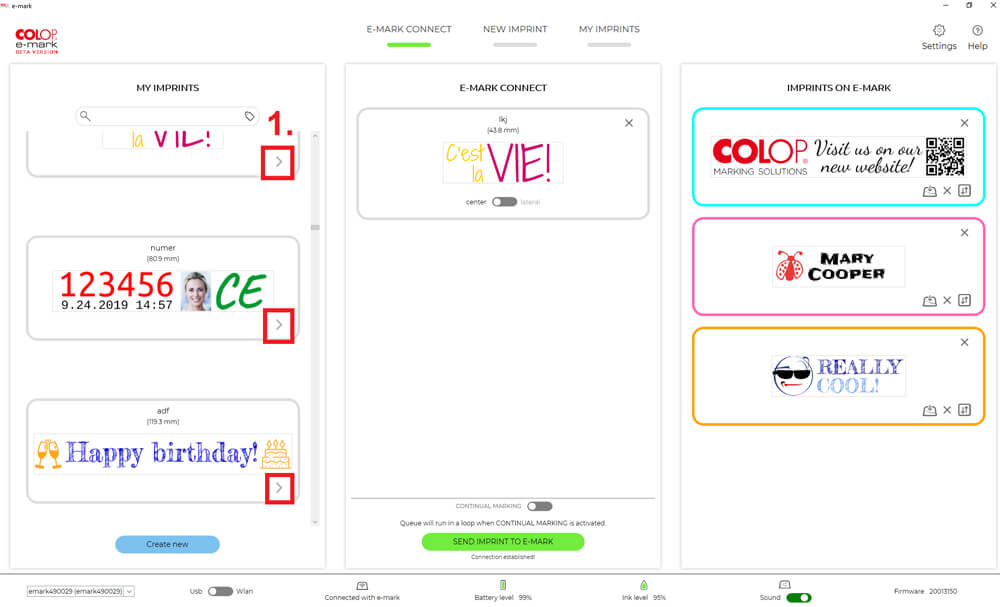


Moreover, you can add more imprints to the print queue to send to the e-mark one after the other sequentially.

Please note: if you select the "Continual Marking" function or if you have imprints with a numbering function, no further imprints can be added to the print queue.
How do I connect my e-mark to the desktop software?
There are two ways to connect the e-mark with the desktop app.
The second variant is a connection via WiFi (mainly for laptops) and the second variant is a connection via USB cable.
INFO: When starting up your e-mark for the first time, you must always connect via WiFi. This can be done via the mobile app or the desktop version. After performing the firmware update on the e-mark , the USB version can also be used.
Switch between WiFi and USB
To change the type of connection between e-mark and your device, you can find two buttons in the app below left. Please note that the e-mark can only connected to one device at a time, either via WiFi or via USB. To establish a connection with another device, the existing connection must first be disconnected. Even when changing between USB and WLAN, the existing connection must be disconnected.

Light display when e-mark connected
The light on the back right shows whether and how the e-mark is connected with a device. A WiFi connection is indicated by a blue light, a USB connection by a pink light. If there is no active connection, no light is visible.

WiFi connection of the desktop software
When using the desktop software with WiFi connection, it may be necessary to separate existing LAN connections first.